Understanding how much time (really) goes into making a quick, short video. Yaaay! It’s tres magique!
“I just need a super simple, easy video. Nothing complicated. It can even be a single cut from one camera angle. Isn’t that how Alfred Hitchcock shot the movie “Rope?” That’s it—a piece of cake!”

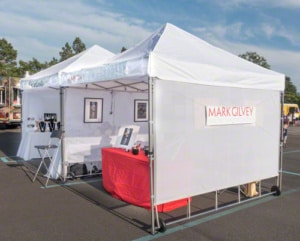
Photo of two vendor booths belonging to CorseCrafts (handmade jewelery) and Mark Gilvey Fine Art Photography. Mark’s tent features mesh panels made by Flourish. The canopy of each tent is the bright white part above the mesh panels. Click photo for enlargement.
I said this to myself as I attached a 24mm tilt-shift lens onto my camera body. I had just purchased two white event tents. One for my wife to use to display her artisan jewelry and another to display my fine art photography at art shows. After working with the tents for a few shows, I quickly learned that folding them was not an easy task. As I looked around at other vendors, my suspicions were confirmed—no one has a clue of how to put a tent away nicely. In addition, once you have them folded, they need to fit back into a bag.
The creators of these tents must have a degree in Origami because I could not figure out how to fold a tent so it would fit into a bag to save my life.
I decided to take some time to figure it out. In the process, I decided it would just be easier to make a video so I could see how to do it. This would take less time than having to read notes about it. That makes sense doesn’t it? Then I decided that I would make it available on the web to help other tent owners. Since I run a photography and graphic design business, I needed to brand the video and come up with some nice music.
Camera Work
I spent a good amount of time setting up my DSLR and figuring out where the live area of the yard would be. This was necessary so when I laid out the tent canopy, it wouldn’t extend outside the camera frame. Oh, did I mention that I placed the camera on top of a 15′ light stand? It’s not easy to see through the viewfinder at that height. I don’t know of any way short of tethering to a computer or using a Camranger and I wasn’t set up for that.
After I did several tests, I finally began the shoot in earnest. As I raised the camera; I realized that the camera microphone was never going to pick up my voice when I was not facing the camera. So I connected my Zoom H2n microphone with a lavaliere microphone and recorded the audio for my voice. This meant I would have to match up the audio from the camera recording with the Zoom recording during post.
Remember, this is supposed to be easy and quick.
I decided to take a couple of still photos of the bag I was going to put the tent into so the viewer could get a closer view. So now I’ve added another camera and another media card to offload and process photos.
CAMERA WORK TIME: 8 hours
You would think that the camera could just be on the light stand; turned on and sent up. Well yes, but if you don’t know where the boundaries are you could take even longer. You could end up shooting many more times than if you made notes and did tests. Every project that anyone works on requires this. That is why it takes so long to complete. It’s all custom work. I could do this faster next time because I took notes which would only take off about two hours.
Editing
The footage was just one long clip—that’s it. It was just a 10 minute clip. As it turns out, the exposure was a little dark. So I needed to do color correction and enhancement to it (this is also known as color grading.) Then I processed the still photos and exported them for use in the video. Oh, I had to match their color to the color in the video by-th-way. These images were placed at specific points in the time line. They would provide a better view of some kind of action taking place on-screen. They would also help break up the video since it was all one long cut from a single camera position.
I synced the audio track from the Zoom mic but noticed a couple foe-pah’s in my speech so I had to edit them first. In this case, I used a music bed I had edited for another video so I didn’t have to do anything with it for this one. Sometimes stock music is not long enough in the right areas so it has to go through an edit. I was lucky this time. I also added my logo(s) and an animation that went with one of them. Then reviewed everything through about 50+ times over the course of the production.
I also added Closed Captioning. This took about three hours to complete.
EDITING TIME: 11 hours
I wasn’t able to just add my company logos. The Mark Gilvey Creative logo needed to animate. So I took about two hours to make an animation I could use in other videos and then I was able to place them in the video. Some companies don’t have their logos in proper format. Logos need to be independent of any background and it takes extra time to do this for them. Luckily, I am the designer of mine so I just had to make the animation.
YouTube Integration and Blog Post
Next, I needed to upload the video and the closed captioning to YouTube. Add all the necessary text so it could users could find it in search. I also created a custom thumbnail for it. Lastly, I made a post on my fine art photography website.
SOCIAL MEDIA PREP TIME: 4 hours
So where does that put us so far? If I take out the time that I won’t spend next time I do this it looks like 6 + 8 + 4 = 18 hours
Going Live – Sort of
Well, my blog post went live but I didn’t tell anyone about it, call it a soft launch. The video was kept private as well. I showed it to some friends of mine and they sent me some comments back. Their comments were things that I could “easily” integrate into the video. (there’s that word again.) Those easy video edits added another six hours to the production time.
FIRST REVIEW UPDATES TIME: 6 hours
TOTAL TIME 24 hours (with the extra time removed as mentioned)
Putting It In Perspective
So class, what we learned today is that everything turns out to be longer than you expect it to. For a company looking to hire someone to create such a video, let’s put it in quantitative terms. It required almost 3 hours per minute to create THIS specific video with my skill level. Video has a lot of overhead. I have made videos in the past that took 10 hours per second (you read that right; 10h/sec) to create. You can’t expect a video to be produced on a photography or graphic design budget.
Now that was easy wasn’t it?

