Mark Gilvey contributes three restoration tips to professional photo-retouching magazine.
In August 2014, I received an email from a freelance writer who was working on a feature article for Advanced Photoshop. Based in the UK, the magazine specializes in cutting-edge trends for creative professionals wanting to master high-end commercial Photoshop skills. She asked if I would have time for an interview by phone or through email. What a great opportunity I thought to myself and I immediately wrote back to him!
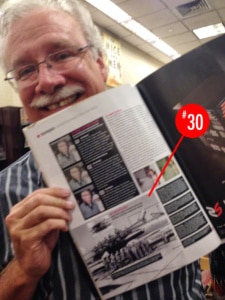 The writer was particularly interested in information about my photo restoration work, so she sent me a list of questions to answer. I’ve been working with Adobe Photoshop since 1994 (my goodness that’s 20 years already) and I wanted to provide some well-thought-out answers that readers could learn from. Pros were going to be reading this, after all.
I submitted my answers and a couple of photos, then waited for the issue to come out. Issue 126 finally arrived at the bookstore during the second week of October. The article is called 30 Retouching Tips For Pros (p. 034) and three of the four photos I sent appear in Tips 12, 25, and 30 along with my interview responses.
 As it turned out, they needed only a small portion of the content I provided because they had to make room for all of the other great tips as well. Below I have placed (with permission of the editor of Advanced Photoshop magazine) the full text of my interview, but I have left out the specific content that appeared in the magazine—you’ll have to purchase your own copy I’m afraid.
I have included a few additional images in this blog post for illustration purposes. And now the interview…
AP: What makes a good retoucher?
MG: Patience! It’s not enough to just be able to clone something out. You’re not a retoucher if that is all you can do—you are only doing what the software manufactures are making easier for you to do. Unfortunately, it takes much more than that. You have to have patience to reconstruct something (from scratch if necessary).
I remember the first time this hit home for me. I was learning Photoshop 2.0 at a company that was in the process of making the transition to a digital workflow. At that time I was producing what people do in Photoshop, but on film—I made optical special effects for multiprojector slide shows using what was called an optical printer (Marron 1400). This special effects camera was similar to the one used to make the early Star Wars movies.
The project I was working on involved a photo composite for a corporate promo brochure. It was a two-page spread consisting of a photo of the earth centered over a dried-up bed of water on one side and green grass on the other. I had completed the basics of the image: a composite of the earth on top of the clay bed and grass. When I sent it to a service bureau for film output, their retoucher had a few suggestions for the image. He suggested that he add some dimensionality to the moon with some shading and new grass growing out of the clay. I thought “How cool is that.”  When it was finished, I looked in amazement at how he had inserted individual blades of grass within the clay to look like new growth—that took patience! In those days, we were using a Mac II where you would move something, and then go off to drink an entire cup of coffee while it worked. This was still faster than doing it on film. Anyway, the idea that one needs to have the patience and will to make many changes on a microscopic level has stayed with me ever since.
The software companies all want you to think that anything can be done in a jiffy. But to be a professional retoucher, you have to be willing to go much further. That doesn’t mean you should take forever to do everything. In a production atmosphere, speed is essential. But when you are working a money shot image, time should be the least of the client’s concerns. A photo retoucher is not someone who just pushes buttons; this person is an artist pure and simple! That said, a deadline is a deadline.
Below is a before and after of one of the photos I submitted (for details, see Tip 25 in the magazine article). To view the before and after here, just slide the circle left and right.
AP: What are the most common things you have to fix/create, and what are the trickiest? How do you tackle them?
MG: When I was doing production work at a Web design company, I had to improve client photos all the time. Particularly with realtor photos, perspective was always off, rooms were dark, and files were too small for the mediums they would go into. Miracles were required.
AP: How do you decide how far to go? Where’s the line when retouching/restoration becomes too much?
MG: I use several rules, but the most important is probably the ZR90 Rule when it comes to retouching or image creation. Named after one of my former creative directors, Zev Remba (now art directing from a better place), he used to tell me this while I was working on big projects:
“Get the file to 90% finished because the other 10% you’ll spend the rest of your life changing things.”
Rule: There will always be some point in your life where you will see the image and say, “Man, if I used this new tool on that image now…” Hence, the Infinitely Never Finished Rule.
Rule: If you are restoring a client photograph, it is important to get the client involved in the process so they will understand how much time goes into the restoration. Once they understand that it’s not a push button process, they will use what I call the Good-Nuff Rule. This is the rule that is applied when the image looks good enough for the specific intended use and every image has one. Sometimes “perfect” is good-nuff and then later it’s not, which goes back to the Infinitely Never Finished Rule.
Rule: I have a similar rule for exporting video to various formats and sizes that I call the Threshold of Pain Rule. This means the client needs to figure out what their threshold of pain is when looking at the final exported video. Do they want it to run smooth and be a small file, or to look great and run kind of chunky? But you can’t have all.
And there is one more rule; the How Come Everyone Else’s Work ALWAYS Looks Better than Your Own Rule. That is the rule that dictates your reaction when you look at someone else’s work and think it looks better than yours. What you don’t realize is that means your work is being set on a high pedestal to someone else who thinks their own work is bad, so it works out in the end.
AP: Where do you start with an image? Is it always the same thing, or with the biggest problems?
MG: It really depends on the circumstance. If I was given a broken print, I would first find out what size the client wants the final image to be so I scan enough data. Next, I would assemble it back together digitally. After that, I’d probably work on the small things like removing dust and scratches. Then, I’d move on to fixing missing parts and, finally, to color. But like I said, it really depends on the image; I don’t think there is any one road to this destination.
AP: Do clients generally know exactly what they want done, or do they just want you to weave your magic?
MG: I’ve experienced all of the above. I’ve had art directors slip a sketch they made on paper napkin under the door of my office, with a note like “Make it nice, not too expensive and by-the-way, I need it yesterday.” Some clients know what they want; others don’t. Some don’t realize that they don’t know what they need (they don’t know what they don’t know). My design partner (Sherri Arnaiz Design) says, “Just do your Mark magic.”
AP: What are your favourite/most used Photoshop features?
MG: All of the various cloning tools are indispensable! That said, it is still difficult to retouch something that is on a radial gradient. Let me explain. One way to test your skills at spotting and cloning is to try these two exercises:
- Purchase issue 126 of the magazine to read tip on why it’s important to know how to fix a gradient.
- Now make another gradient, this time using the radial Gradient Tool. You will see radial gradients in nature, on people, in many places, and they are not all created symmetrically. This type of gradient is more difficult to fix because the pixel values change in all directions. Sometimes you’ll get it, sometimes not. The various new cloning tools are a good help, but even I struggle with it from time to time.
Just for kicks, here is another exercise you can do. The masking tools have come a long way in Photoshop, but don’t rule out tracing by hand using the Pen Tool and making a mask from its selection. Test yourself: Make a circle in no more than four clicks. Once you know how to do this, you can look at any curve and know if you can do it in one click or more depending on how far it goes. This will also help you if you ever have to reconstruct a logo into a vector format.
The other exercise is to trace your name with the Pen Tool. This teaches you to use the various keyboard combinations to change directions and helps increase your speed when creating paths.
There is a real art to making masks and removing things off of backgrounds, and it takes patience to do this.
Many times, the Refine Edge Tool has saved me from having to make hair masks. But it’s not perfect; I think there is still room for improvement.
I also love layer masks (they add the “ooooh”) and blending modes (they add the “aaaah”) and smart objects (Hallelujah!).
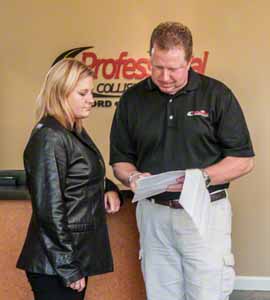
This as a straight shot. You can see the logo in the background is fairly sharp. Lets blur it to give the people more distance from the background.
AP: Is there anything you do with a particularly unique method, or with a different tool than others might?
MG: Yes! Here’s a good one that I call the Forced Blur Background. This is the blurring of a background to give the image a sense of depth. Let’s say you have a photo of a person that has too much depth of field (everything in front and behind them is in focus). You want to blur the background but, after you have masked the subject and applied the blur, a dark halo appears around the subject. How do you get rid of the dark glow?

In this version, a mask was created for the people and the background was blurred. Notice the dark halo around the people.
Process
Make a mask for your subject and place that object on its own layer (retain a layer mask that separates it from the full image). Name that layer “Foreground.”
Duplicate the original background layer so it is below the “Foreground” layer. Go into the Liquify Tool and push the subject edges a little inward so it looks smaller on all edges.
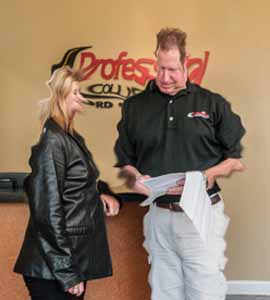
This step shows the photo after the Liquify Tool was applied to push the people into a smaller shape than they were originally.
It will look like a squiggly mess, but don’t worry. If the subject is in front of a background that has areas that have lines, push the Liquify Tool along the lines in the direction the line is going, not opposite it. Get out of the Liquify Tool. Label this layer as “Liquify.”
Now, with your Foreground layer turned on, you should have an image that looks about the same because you just pushed into the area occupied by the sharp area on the Liquify layer.
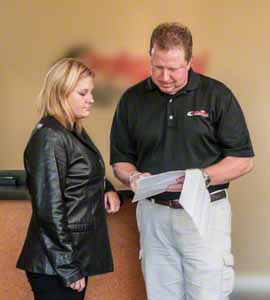
In this step, the background was disfigured using the Liquify Tool within a smart object containing the layer. Then the Smart Object was blurred and the counter layer mask within the Gaussian Blur filter layer was protected from the effect by spraying black into the layer where the counter is located.
Convert the Liquify layer to a smart object (Hallelujah!), and then apply Gaussian Blur or your blur filter of choice. Because you pushed the image inside the area occupied by the Foreground layer, when you add blur to it, there won’t be a halo around the Foreground layer. If you add a lot of blur, eventually the area you pushed in will add a glow around the Sharp layer, just drill down into the Liquify layer and push it in some more.
Think Locally
The other suggestion I can pass on to new retouchers and restoration artists is: stop thinking globally. Whenever you make a change to something, first duplicate a layer and apply the effect or repair globally but use a layer mask to apply it locally. Don’t get into the mindset of “I applied this treatment to the whole image, and then this one, and this one.” Think like a painter: brush this treatment into this area, and not so much in that area.
By doing this, you will start to control the viewers eye, where it goes when and what you want them to see. Become a photographic artist instead of someone who takes pictures. It’s the equivalent to clients who think every bit of text should be red, or bold, or underlined; something has to give your image hierarchy.
AP: What advice would you give to someone, who is good with Photoshop generally, but wants to specialize in your type of retouching?
MG: Don’t look at Photoshop as your only vehicle to get to your goals. Being a retoucher, creator, and restorer requires an understanding of many forms of digital art, including 3D, vector art, animation, typography, and layout. Just using Photoshop is the equivalent of photographers telling me they don’t use Photoshop because they “get it right in camera.” Yea, right! You must be willing to expand your knowledge and learn on the fly when you have to.
There is no perfect project. I still have to learn things on most every project I do and I’ve been doing this in the digital world since 1995.
Everything changes. The smarter the software gets, the easier it is for everyone to do the same thing. It comes down to concepts (the story you tell), how well you execute them, and working with the right people. Hook up with art directors who have ideas for things that they can’t do themselves.
Most importantly, do what you love doing! It will get you through hard times, and it will be euphoric when you are working in great times. My father always told me you have to want something so much you can taste it. I can’t describe the taste, but it happens when you walk into an interview with a company that has all the toys you ever dreamed of and the team support to go with it. It also happens when you are out on your own and you decide to goof off for a day because you just earned in one day what your old full-time job paid you in a week.
RANDOM THOUGHTS
- Retouchers should also learn to be photographers; they need to understand what goes on behind the camera so that the most can be made of the shot at the time of capture. I know that most retouchers get their work after the fact, but maybe it’s time they come out of the shadows and catch the little stuff before it gets to them. Participate in the shoot when possible; it’s great for your networking and you might get more gigs because there is a face AND a personality behind the wizardry.
- Retouching is a little like cleaning your house; only after you’ve cleaned up do you realize what the real problems are and can make a plan to improve them.
- The best way to improve an old image or photo is to reprocess it through newer software.
Squadron Retouch
Group photos are important to every family. But military group photos, at least to me, have an elevated importance because these “heroes” depended on each other in a way that no civilian family could understand. Restoring this photo was very special to me because the life of each man who received a print of it would be touched (for details, see Tip 30 in the magazine article).
This was a fantastic opportunity, and I’m happy to have had the opportunity to share what I know. Advanced Photoshop is a valuable resource for any experienced user. I’ve always said that you can excel quicker at Photoshop once you know what you’re doing. Yea, it sounds like a catch-22, but it’s really true. If you are aspiring to become a Photoshop pro, get your skills up, read Advanced Photoshop, and be inspired. Oh, the third image in the magazine article is the old port at sunrise photo that I used for the feature image of this blog post.
ARE YOU INTERESTED IN PHOTOSHOP TRAINING?
Read more here.




Hey Mark.
Found your post as a result of the DCWW Friday brag. Many congratulations!!
Sue
sjzdesign.com